Tengine
官网: http://tengine.taobao.org/
部署tengine2.3.2
1.下载指定版本,获取淘宝的nginx源代码
官网: http://tengine.taobao.org/download.html
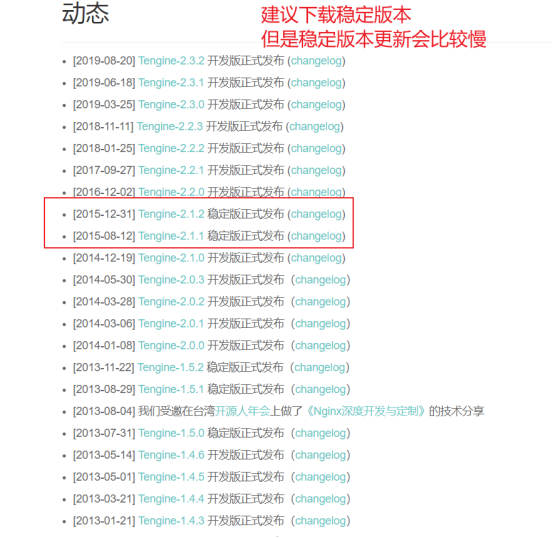
wget http://tengine.taobao.org/download/tengine-2.3.2.tar.gz
2 创建用户,下载依赖的安装包
groupadd nginx
#useradd -s /sbin/nologin -g nginx -M nginx
useradd -r -M -g nginx -c "create-time is `date +%Y/%m/%d`;is web service" -s /sbin/nologin nginx
解决编译安装nginx的软件依赖:
yum install gcc patch libffi-devel python-devel  zlib-devel bzip2-devel openssl-devel ncurses-devel sqlite-devel readline-devel tk-devel gdbm-devel db4-devel libpcap-devel xz-devel openssl openssl-devel -y
yum -y install gc gcc gcc-c++ pcre-devel zlib-devel openssl-devel pcre-devel pcre -y
3.解压缩nginx 源代码后,进入源代码的目录,准备开始编译
tar -zxvf tengine-2.3.2.tar.gz
进入源代码目录后,查看目录下有哪些内容
[root@backup tengine-2.3.2]# ll
total 380
-rw-rw-r--  1 root root    889 Sep  5  2019 AUTHORS.te
drwxrwxr-x  6 root root   4096 Sep  5  2019 auto       检测系统模块一栏信息
-rw-rw-r--  1 root root 298825 Sep  5  2019 CHANGES    存放nginx的变化记录日志
-rw-rw-r--  1 root root  25609 Sep  5  2019 CHANGES.cn
-rw-rw-r--  1 root root  32748 Sep  5  2019 CHANGES.te
drwxrwxr-x  2 root root    184 Sep  5  2019 conf       存放nginx主配置文件的目录
-rwxrwxr-x  1 root root   2502 Sep  5  2019 configure  可执行的脚本,用于释放编译文件的定制脚本
drwxrwxr-x  4 root root    109 Sep  5  2019 contrib    提供了vim插件,让配置文件的颜色区分,更友好
drwxrwxr-x  4 root root     67 Sep  5  2019 docs
drwxrwxr-x  2 root root     40 Sep  5  2019 html       存放了编制内的html页面文件
-rw-rw-r--  1 root root   1715 Sep  5  2019 LICENSE
drwxrwxr-x  2 root root     21 Sep  5  2019 man
drwxrwxr-x 26 root root   4096 Sep  5  2019 modules
drwxrwxr-x  3 root root     20 Sep  5  2019 packages
-rw-rw-r--  1 root root   3421 Sep  5  2019 README.markdown
drwxrwxr-x 10 root root    103 Sep  5  2019 src        存放了nginx源代码的目录
drwxrwxr-x  4 root root     43 Sep  5  2019 tests
-rw-rw-r--  1 root root     43 Sep  5  2019 THANKS.te
开始编译Nginx,扩展编译模块 列出Nginx的编译选项,如制定安装路径,配置文件、日志文件等路径,指定开启模块功能等
./configure --help
5.编译Nginx初步,
./configure \
--prefix=/usr/local/tengine232 \
--user=nginx \
--group=nginx \
--sbin-path=/usr/local/tengine232/sbin/nginx \
--conf-path=/usr/local/tengine232/conf/nginx.conf \
--http-log-path=/usr/local/tengine232/logs/access.log \
--error-log-path=/usr/local/tengine232/logs/error.log \
--pid-path=/usr/local/tengine232/run/nginx.pid \
--lock-path=/usr/local/tengine232/run/nginx.lock \
--with-http_ssl_module \
--with-http_secure_link_module \
--with-http_flv_module \
--with-http_gzip_static_module \
--with-http_mp4_module \
--with-http_gunzip_module \
--with-http_sub_module \
--with-http_stub_status_module \
--with-http_realip_module \
--with-pcre \
--with-stream \
--with-stream=dynamic \
--with-stream_ssl_module \
--with-stream_sni \
--with-stream_realip_module \
--with-stream_ssl_preread_module  \
--with-threads \
--with-file-aio \
--with-http_addition_module \
--with-http_dav_module \
--with-http_random_index_module \
--http-client-body-temp-path=/usr/local/tengine232/client_body_temp \
--http-proxy-temp-path=/usr/local/tengine232/proxy_temp \
--http-fastcgi-temp-path=/usr/local/tengine232/fastcgi_temp \
--http-uwsgi-temp-path=/usr/local/tengine232/uwsgi_temp \
--http-scgi-temp-path=/usr/local/tengine232/scgi_temp \
注:
#指定运行权限的用户   --user=nginx
#指定运行的权限用户组   --group=nginx
#指定安装路径   --prefix=/usr/local/nginx
#支持nginx状态查询 --with-http_stub_status_module
#开启ssl支持   --with-http_ssl_module
#开启GZIP功能   --with-http_gzip_static_module
6.执行make编译
make
7.首次编译安装,生成Nginx的可执行命令
make install
8.检查Prefix指定的安装目录
[root@backup opt]#ll /usr/local/tengine232/ -d
drwxr-xr-x 7 root root 69 Oct 23 19:18 /usr/local/tengine232/
9.Nginx的程序目录
[root@backup tengine232]# cd /usr/local/tengine232
[root@backup tengine232]# ll
total 1220
drwx------  2 nginx root       6 Oct 26 02:10 client_body_temp
drwxr-xr-x  4 root  root    4096 Nov 11 13:16 conf
drwx------  2 nginx root       6 Oct 26 02:10 fastcgi_temp
drwxr-xr-x  4 root  root      80 Nov  2 20:50 html
drwxr-xr-x  2 root  root      83 Nov  7 14:48 logs
drwxr-xr-x  2 root  root      98 Nov 11 18:32 modules
drwx------ 12 nginx root      96 Oct 28 18:47 proxy_temp
drwxr-xr-x  2 root  root       6 Nov 11 18:32 run
drwxr-xr-x  2 root  root      36 Nov 11 18:32 sbin
drwx------  2 nginx root       6 Oct 26 02:10 scgi_temp
drwx------  2 nginx root       6 Oct 26 02:10 uwsgi_temp

# tree
# tree -L 2
.
├── client_body_temp
├── conf
│   ├── access_by_redis.lua
│   ├── fastcgi.conf
│   ├── fastcgi.conf.default
│   ├── fastcgi_params
│   ├── fastcgi_params.default
│   ├── gray.lua
│   ├── koi-utf
│   ├── koi-win
│   ├── mime.types
│   ├── mime.types.default
│   ├── nginx.conf
│   ├── nginx.conf.default
│   ├── scgi_params
│   ├── scgi_params.default
│   ├── uwsgi_params
│   ├── uwsgi_params.default
│   └── win-utf
├── fastcgi_temp
├── GeoIP.dat
├── html
│   ├── 40x.html
│   ├── 50x.html
│   └── index.html
├── logs
│   ├── access.log
│   ├── error.log
├── modules
│   ├── ngx_stream_module.so
├── proxy_temp
├── run
├── sbin
│   ├── nginx
├── scgi_temp
└── uwsgi_temp

25 directories, 30 files
依次是配置文件,静态文件,日志,模块,二进制命令目录
10.创建nginx的环境变量文件,修改如下,创建/etc/profile.d/nginx.sh脚本文件便于以后维护
echo 'export PATH=/usr/local/tengine232/sbin:$PATH' > /etc/profile.d/nginx.sh
11.退出会话,重新登录终端,此时可以正常使用nginx
# echo $PATH
/usr/local/tengine232/sbin:/usr/local/sbin:/usr/local/bin:/usr/sbin:/usr/bin:/root/bin
12.检查nginx的编译模块信息
# ./sbin/nginx -V
Tengine version: Tengine/2.3.2  #Tengine版本
nginx version: nginx/1.17.3     #nginx版本
built by gcc 7.3.1 20180712 (Red Hat 7.3.1-9) (GCC)
built with OpenSSL 1.0.2k-fips  26 Jan 2017
TLS SNI support enabled
configure arguments: --prefix=/usr/local/tengine232 --user=nginx --group=nginx --with-http_ssl_module --with-http_secure_link_module --with-http_flv_module --with-http_gzip_static_module --with-http_sub_module --with-http_stub_status_module --with-http_realip_module --with-pcre --with-stream --with-stream=dynamic --with-stream_ssl_module --with-stream_sni --with-stream_realip_module --with-stream_ssl_preread_module --with-threads --with-file-aio
命令行参数
'-m' 选项
显示所有编译的模块,自1.4.0以来,Tengine支持动态模块,static表示静态编译,shared表示动态编译(后面接的是动态模块的版本)。下面是例子:
'-l' 选项
显示所有支持的指令:
13.配置开机启动脚本
# vim /usr/lib/systemd/system/nginx.service
[Unit]
Description=nginx - high performance web server
Documentation=http://nginx.org/en/docs/
After=network.target remote-fs.target nss-lookup.target

[Service]
Type=forking
PIDFile=/usr/local/tengine232/logs/nginx.pid
ExecStartPre=/usr/local/tengine232/sbin/nginx -t -c /usr/local/tengine232/conf/nginx.conf
ExecStart=/usr/local/tengine232/sbin/nginx -c /usr/local/tengine232/conf/nginx.conf
ExecReload=/bin/kill -s HUP $MAINPID
ExecStop=/bin/kill -s QUIT $MAINPID
PrivateTmp=true

[Install]
WantedBy=multi-user.target
14.启动服务
systemctl daemon-reload
systemctl start nginx
systemctl reload  nginx.service
systemctl status nginx.service
ss -nutlp | grep 80
使用tengine的负载均衡功能
参考: https://tengine.taobao.org/document_cn/http_upstream_check_cn.html
加载nginx_upstream_check_module模块
官网网址:https://github.com/yaoweibin/nginx_upstream_check_module
下载模块
wget https://codeload.github.com/yaoweibin/nginx_upstream_check_module/zip/master
wget https://github.com/yaoweibin/nginx_upstream_check_module/archive/master.zip
解压模块
unzip master
进入nginx的源码目录
cd /usr/local/src/tengine-2.3.2/
~~打补丁(不需要打补丁,打补丁安装不了)~~
patch -p1 < ../nginx_upstream_check_module-master/check_1.16.1+.patch
patching file src/http/modules/ngx_http_upstream_hash_module.c
Reversed (or previously applied) patch detected!  Assume -R? [n] R
Apply anyway? [n] y
Hunk #1 succeeded at 4 with fuzz 2 (offset -5 lines).
Hunk #2 succeeded at 253 with fuzz 2 (offset 15 lines).
Hunk #3 succeeded at 583 (offset 18 lines).
patching file src/http/modules/ngx_http_upstream_ip_hash_module.c
Reversed (or previously applied) patch detected!  Assume -R? [n] R
Apply anyway? [n] y
Hunk #1 succeeded at 4 with fuzz 2 (offset -5 lines).
Hunk #2 succeeded at 224 with fuzz 2 (offset 16 lines).
patching file src/http/modules/ngx_http_upstream_least_conn_module.c
Hunk #1 succeeded at 4 with fuzz 2 (offset -5 lines).
Hunk #2 succeeded at 165 with fuzz 2 (offset 15 lines).
Hunk #3 succeeded at 240 with fuzz 2 (offset 25 lines).
patching file src/http/ngx_http_upstream_round_robin.c
Reversed (or previously applied) patch detected!  Assume -R? [n] R
Apply anyway? [n] y
Hunk #1 succeeded at 4 with fuzz 2 (offset -5 lines).
Hunk #2 succeeded at 196 with fuzz 1 (offset 95 lines).
Hunk #3 FAILED at 174.
Hunk #4 succeeded at 288 with fuzz 1 (offset 48 lines).
Hunk #5 succeeded at 421 with fuzz 2 (offset 62 lines).
Hunk #6 succeeded at 465 with fuzz 1 (offset 69 lines).
Hunk #7 FAILED at 464.
Hunk #8 succeeded at 667 with fuzz 2 (offset 109 lines).
2 out of 8 hunks FAILED -- saving rejects to file src/http/ngx_http_upstream_round_robin.c.rej
patching file src/http/ngx_http_upstream_round_robin.h
Hunk #1 succeeded at 45 (offset 7 lines).
编译
./configure \
--prefix=/usr/local/tengine232 \
--user=nginx \
--group=nginx \
--sbin-path=/usr/local/tengine232/sbin/nginx \
--conf-path=/usr/local/tengine232/conf/nginx.conf \
--http-log-path=/usr/local/tengine232/logs/access.log \
--error-log-path=/usr/local/tengine232/logs/error.log \
--pid-path=/usr/local/tengine232/run/nginx.pid \
--lock-path=/usr/local/tengine232/run/nginx.lock \
--with-http_ssl_module \
--with-http_secure_link_module \
--with-http_flv_module \
--with-http_gzip_static_module \
--with-http_mp4_module \
--with-http_gunzip_module \
--with-http_sub_module \
--with-http_stub_status_module \
--with-http_realip_module \
--with-pcre \
--with-stream \
--with-stream=dynamic \
--with-stream_ssl_module \
--with-stream_sni \
--with-stream_realip_module \
--with-stream_ssl_preread_module  \
--with-threads \
--with-file-aio \
--with-http_addition_module \
--with-http_dav_module \
--with-http_random_index_module \
--http-client-body-temp-path=/usr/local/tengine232/client_body_temp \
--http-proxy-temp-path=/usr/local/tengine232/proxy_temp \
--http-fastcgi-temp-path=/usr/local/tengine232/fastcgi_temp \
--http-uwsgi-temp-path=/usr/local/tengine232/uwsgi_temp \
--http-scgi-temp-path=/usr/local/tengine232/scgi_temp \
--add-module=../nginx_upstream_check_module-master/    #编次模块
安装
make   # (注意:此处只make,编译参数需要和之前的一样)
make install
tengine配置反向代理格式和haproxy很相似;
后端两台服务器事先自己准备好网页服务(nginx/httpd等都可以)
check指令
该指令可以打开后端服务器的健康检查功能。
Syntax: check interval=milliseconds [fall=count] [rise=count] [timeout=milliseconds] [default_down=true|false] [type=tcp|http|ssl_hello|mysql|ajp] [port=check_port]
Default: 如果没有配置参数,默认值是:interval=30000 fall=5 rise=2 timeout=1000 default_down=true type=tcp
Context: upstream
指令后面的参数意义是:
-
interval:向后端发送的健康检查包的间隔。
-
fall(fall_count): 如果连续失败次数达到fall_count,服务器就被认为是down。
-
rise(rise_count): 如果连续成功次数达到rise_count,服务器就被认为是up。
-
timeout: 后端健康请求的超时时间。
-
default_down: 设定初始时服务器的状态,如果是true,就说明默认是down的,如果是false,就是up的。默认值是true,也就是一开始服务器认为是不可用,要等健康检查包达到一定成功次数以后才会被认为是健康的。
-
type:健康检查包的类型,现在支持以下多种类型
-
tcp:简单的tcp连接,如果连接成功,就说明后端正常。
-
ssl_hello:发送一个初始的SSL hello包并接受服务器的SSL hello包。
-
http:发送HTTP请求,通过后端的回复包的状态来判断后端是否存活。
-
mysql: 向mysql服务器连接,通过接收服务器的greeting包来判断后端是否存活。
-
ajp:向后端发送AJP协议的Cping包,通过接收Cpong包来判断后端是否存活。
-
-
port: 指定后端服务器的检查端口。你可以指定不同于真实服务的后端服务器的端口,比如后端提供的是443端口的应用,你可以去检查80端口的状态来判断后端健康状况。默认是0,表示跟后端server提供真实服务的端口一样。该选项出现于Tengine-1.4.0
比如健康检查配置:
upstream test_web {
    server 192.168.1.21:80;
    server 192.168.1.22:80;
    check interval=3000 rise=2 fall=5 timeout=1000 type=http;
}
上面配置的意思是,对test_web这个负载均衡条目中的所有节点,每个3秒(3000毫秒)检测一次,请求2次正常则标记realserver状态为up,如果检测5次都失败,则标记realserver的状态为down,超时时间为1秒。
check_keepalive_requests指令
Syntax: check_keepalive_requests request_num
Default: 1
Context: upstream
该指令可以配置一个连接发送的请求数,其默认值为1,表示Tengine完成1次请求后即关闭连接
check_http_send 指令
Syntax: check_http_send http_packet
Default: "GET / HTTP/1.0\r\n\r\n"
Context: upstream
该指令可以配置http健康检查包发送的请求内容。为了减少传输数据量,推荐采用"HEAD"方法。
当采用长连接进行健康检查时,需在该指令中添加keep-alive请求头,如:"HEAD / HTTP/1.1\r\nConnection: keep-alive\r\n\r\n"
同时,在采用"GET"方法的情况下,请求uri的size不宜过大,确保可以在1个interval内传输完成,否则会被健康检查模块视为后端服务器或网络异常
check_http_expect_alive 指令
Syntax: check_http_expect_alive [ http_2xx | http_3xx | http_4xx | http_5xx ]
Default: http_2xx | http_3xx
Context: upstream
该指令指定HTTP回复的成功状态,默认认为2XX和3XX的状态是健康的。
check_shm_size 指令
Syntax: check_shm_size size
Default: 1M
Context: http
所有的后端服务器健康检查状态都存于共享内存中,该指令可以设置共享内存的大小。默认是1M,如果你有1千台以上的服务器并在配置的时候出现了错误,就可能需要扩大该内存的大小。
check_status 指令
Syntax: check_shm_size size
Default: 1M
Context: http
显示服务器的健康状态页面。该指令需要在http块中配置。
在Tengine-1.4.0以后,你可以配置显示页面的格式。支持的格式有: html、csv、 json。默认类型是html。
你也可以通过请求的参数来指定格式,假设/status是你状态页面的URL, format参数改变页面的格式,比如:
/status?format=html
/status?format=csv
/status?format=json
同时你也可以通过status参数来获取相同服务器状态的列表,比如:
/status?format=html&status=down
/status?format=csv&status=up
下面是一个HTML状态页面的例子(server number是后端服务器的数量,generation是Nginx reload的次数。Index是服务器的索引,Upstream是在配置中upstream的名称,Name是服务器IP,Status是服务器的状态,Rise是服务器连续检查成功的次数,Fall是连续检查失败的次数,Check type是检查的方式,Check port是后端专门为健康检查设置的端口):
<!DOCTYPE html PUBLIC "-//W3C//DTD XHTML 1.0 Strict//EN
    "http://www.w3.org/TR/xhtml1/DTD/xhtml1-strict.dtd">
    <html xmlns="http://www.w3.org/1999/xhtml">
    <head>
    <title>Nginx http upstream check status</title>
    </head>
    <body>
        <h1>Nginx http upstream check status</h1>
        <h2>Check upstream server number: 1, generation: 3</h2>
        <table style="background-color:white" cellspacing="0" cellpadding="3" border="1">
            <tr bgcolor="#C0C0C0">
                <th>Index</th>
                <th>Upstream</th>
                <th>Name</th>
                <th>Status</th>
                <th>Rise counts</th>
                <th>Fall counts</th>
                <th>Check type</th>
                <th>Check port</th>
            </tr>
            <tr>
                <td>0</td>
                <td>backend</td>
                <td>106.187.48.116:80</td>
                <td>up</td>
                <td>39</td>
                <td>0</td>
                <td>http</td>
                <td>80</td>
            </tr>
        </table>
    </body>
    </html>
下面是csv格式页面的例子:
0,backend,106.187.48.116:80,up,46,0,http,80
下面是json格式页面的例子:
{"servers": {
  "total": 1,
  "generation": 3,
  "server": [
   {"index": 0, "upstream": "backend", "name": "106.187.48.116:80", "status": "up", "rise": 58, "fall": 0, "type": "http", "port": 80}
  ]
 }}
下面是一个状态也配置的范例:
http {
      server {
            location /status {
                   check_status;
                   access_log off;
                   #allow IP;
                   #deny all;
            }
      }
}
nginx upstream模块调度算法详解
轮询
轮询是upstream的默认分配方式,即每个请求按照时间顺序轮流分配到不同的后端服务器,如果某个后端服务器down掉后,能自动剔除。
upstream srv {
        server 127.0.0.1:80;
        server 127.0.0.1:80;
}
weight加权轮询
加权轮询,轮询的加强版,即可以指定轮询比率,weight和访问几率成正比,主要应用于后端服务器异质的场景下。
upstream srv {
        server 192.168.10.101:80 weight=1;
        server 192.168.10.106:80 weight=2;
}
ip_hash
每个请求按照访问ip(即Nginx的前置服务器或者客户端IP)的hash结果分配,这样每个访客会固定访问一个后端服务器,可以解决session一致问题。
upstream srv {
        ip_hash;
        server 192.168.10.101:80;
        server 192.168.10.106:80;
}
注意:
-
当负载调度算法为ip_hash时,后端服务器在负载均衡调度中的状态不能是weight和backup。
-
导致负载不均衡
url_hash(目前用consistent_hash替代url_hash)
参考:https://www.jianshu.com/p/89838a43ebf2
与ip_hash类似,但是按照访问url的hash结果来分配请求,使得每个url定向到同一个后端服务器,主要应用于后端服务器为缓存时的场景下。
upstream srv {
        server 192.168.10.101:80;
        server 192.168.10.106:80;
        hash $request_uri;
        #hash_method crc32;
}
-
其中,hash_method为使用的hash算法,需要注意的是:此时,server语句中不能加weight等参数。
-
提示:url_hash用途cache服务业务,memcached,squid,varnish。特点:每个rs都是不同的。
-
按访问url的hash结果来分配请求,让每个url定向到同一个后端服务器,后端服务器为缓存服务器时效果显著。在upstream中加入hash语句, server语句中不能写入weight等其他的参数,hash_ method是使用的hash算法。。
-
url_ hash.按访问ur1的hash结果来分配请求,使每个url定向到同-一个后端服务器,可以进一步提高后端缓存服务器的效率命中率。Nginx 本身是不支持ur1_ hash的,如果需要使用这种调度算法,必须安装Nginx的hash软件包
least_conn
    upstream srv {
        #least_conn;
        server 127.0.0.1:9990;
        server 127.0.0.1:9996;
        check interval=3000 rise=2 fall=5 timeout=1000 type=http;
        check_http_send "HEAD / HTTP/1.1\r\nConnection: keep-alive\r\n\r\n";
        check_http_expect_alive http_2xx http_3xx http_4xx;
    }
fair
fair顾名思义,公平地按照后端服务器的响应时间(rt)来分配请求,响应时间短即rt小的后端服务器优先分配请求。如果需要使用这种调度算法,必须下载Nginx的upstr_fair模块。
upstream srv {
        fair;
        server 192.168.10.101:80;
        server 192.168.10.106:80;
}
负载均衡综合实例
user  nginx;
error_log  logs/error.log;
pid        logs/nginx.pid;
worker_processes auto;
worker_rlimit_nofile 51200;
worker_cpu_affinity auto;
events {
    use epoll;
    multi_accept on;
    accept_mutex on;
    worker_connections  1024;
}
http {
    include       mime.types;
    default_type  application/octet-stream;
    log_format  main  '$remote_addr - $remote_user [$time_local] "$request" '
                      '$status $body_bytes_sent "$http_referer" '
                      '"$http_user_agent" "$http_x_forwarded_for" $upstream_addr $upstream_status';
    sendfile        on;
    charset utf-8;
    tcp_nopush on;
    tcp_nodelay on;
    keepalive_timeout 65 50;
    keepalive_requests 100;
    send_timeout 60;
    client_max_body_size 10m;
    client_body_buffer_size 128k;
    client_header_timeout 10;
    client_body_timeout 10;
    reset_timedout_connection on;
    client_header_buffer_size 16k;
    server_names_hash_max_size 512;
    server_names_hash_bucket_size 128;

    gzip on;
    gzip_buffers 16 8k;
    gzip_comp_level 6;
    gzip_http_version 1.0;
    gzip_min_length 1024;
    gzip_disable "MSIE [1-6]\.(?!.*SV1)";
    gzip_proxied any;
    gzip_vary on;
    gzip_types
        text/xml application/xml application/atom+xml application/rss+xml application/xhtml+xml image/svg+xml
        text/javascript application/javascript application/x-javascript
        text/x-json application/json application/x-web-app-manifest+json
        text/css text/plain text/x-component
        font/opentype application/x-font-ttf application/vnd.ms-fontobject
        image/x-icon;

    open_file_cache max=1000 inactive=20s;
    open_file_cache_valid 30s;
    open_file_cache_min_uses 2;
    open_file_cache_errors on;

    fastcgi_connect_timeout 300;
    fastcgi_send_timeout 300;
    fastcgi_read_timeout 300;
    fastcgi_buffer_size 64k;
    fastcgi_buffers 4 64k;
    fastcgi_busy_buffers_size 128k;
    fastcgi_temp_file_write_size 128k;

    upstream srv {
        #least_conn;
        #ip_hash;
        #hash $request_uri;
        server 127.0.0.1:9990;
        server 127.0.0.1:9996;
        check interval=3000 rise=2 fall=5 timeout=1000 type=http;
        check_http_send "HEAD / HTTP/1.1\r\nConnection: keep-alive\r\n\r\n";
        check_http_expect_alive http_2xx http_3xx http_4xx;
    }
    server {
        listen       80;
        server_name  localhost;
        access_log  logs/access.log  main;
        location / {
            proxy_pass http://srv;
            proxy_redirect off ;
            proxy_set_header Host $host:$server_port;
            proxy_set_header X-Real-IP $remote_addr;
            proxy_set_header REMOTE-HOST $remote_addr;
            proxy_set_header X-Forwarded-For $proxy_add_x_forwarded_for;
            proxy_connect_timeout 300;
            proxy_send_timeout 300;
            proxy_read_timeout 600;
            proxy_buffer_size 256k;
            proxy_buffers 4 256k;
            proxy_busy_buffers_size 256k;
            proxy_temp_file_write_size 256k;
        }
# 查看负载均衡相关的状态
        location /status {
            check_status;
            access_log off;
        }
        error_page  404              /404.html;
        error_page   500 502 503 504  /50x.html;
        location = /50x.html {
            root   html;
        }
    }
}
上面配置的意思是,对srv这个负载均衡条目中的所有节点,每个3秒(3000毫秒)检测一次,请求2次正常则标记realserver状态为up,如果检测5次都失败,则标记realserver的状态为down,超时时间为1秒。
在生产环境的实施应用中,需要注意的有 2 点:
1、主要定义好type。由于默认的type是tcp类型,因此假设你服务启动,不管是否初始化完毕,它的端口都会起来,所以此时前端负载均衡器为认为该服务已经可用,其实是不可用状态。
2、注意check_http_send值的设定。由于它的默认值是"GET / HTTP/1.0\r\n\r\n"。假设你的应用是通过http://ip/name访问的,那么这里你的check_http_send值就需要更改为"GET /name HTTP/1.0\r\n\r\n"才可以。针对采用长连接进行检查的,这里增加keep-alive请求头,即"HEAD /name HTTP/1.1\r\nConnection: keep-alive\r\n\r\n"。如果你后端的tomcat是基于域名的多虚拟机,此时你需要通过check_http_send定义host,不然每次访问都是失败,范例: check_http_send “GET /mobileapi HTTP/1.0\r\n HOST www.redhat.sx\r\n\r\n”;
更强大的防攻击(访问速度限制)模块
参考:http://tengine.taobao.org/document_cn/http_limit_req_cn.html
指令
Syntax: limit_req_log_level info | notice | warn | error
Default: limit_req_log_level warn
Context: http
和nginx相同
Syntax: limit_req_zone $session_variable1 $session_variable2 ... zone=name_of_zone:size rate=rate
Default: -
Context: http
和nginx类似,不过支持多个变量,并且支持多个limit_req_zone的设置。比如:
limit_req_zone $binary_remote_addr zone=one:3m rate=1r/s;
limit_req_zone $binary_remote_addr $uri zone=two:3m rate=1r/s;
limit_req_zone $binary_remote_addr $request_uri zone=thre:3m rate=1r/s;
上面的第二个指令表示当相同的ip地址并且访问相同的uri,会导致进入limit req的限制(每秒1个请求)。
其中limit_req_zone指令的rate参数的值是支持变量模式的,如下:
limit_req_zone $binary_remote_addr zone=three:3m rate=$limit_count;
limit_req模块模块的请求统计当前兼容nginx官方。如果当前请求的limit_req_zone中所有变量都为空时,请求计数才不会统计。原先版本的tengine中,请>求的limit_req_zone的任意变量为空时,请求计数才不会统计
Syntax: limit_req [on | off] | zone=zone burst=burst [forbid_action=action] [nodelay]
Default: -
Context: http, server, location
zone,burst以及nodelay的使用与nginx的limit req模块中相同
支持开关,默认是打开状态。并且一个location支持多个limit_req指令,当有多个limit_req指令的话,这些指令是或的关系,也就是当其中任意一个限制被触发,则执行对应的limit_req。
forbid_action表示当条件被触发时,nginx所要执行的动作,支持name location和页面(/),默认是返回503。比如:
limit_req_zone $binary_remote_addr zone=one:3m rate=1r/s;
limit_req_zone $binary_remote_addr $uri zone=two:3m rate=1r/s;
limit_req_zone $binary_remote_addr $request_uri zone=three:3m rate=1r/s;
limit_req_zone $binary_remote_addr $request_uri zone=four:3m rate=$limit_count;

location / {
    limit_req zone=one burst=5;
    limit_req zone=two forbid_action=@test1;
    limit_req zone=three burst=3 forbid_action=@test2;

    set $limit_count "10r/s";
    if ($http_user_agent ~* "Android") {
        set $limit_count "1r/s";
    }

    if ($http_user_agent ~* "Iphone") {
        set $limit_count "100r/s";
    }

    limit_req zone=four burst=3 forbid_action=@test2;

}

location /off {
    limit_req off;
}

location @test1 {
    rewrite ^ /test1.html;
}

location @test2 {
    rewrite ^  /test2.html;
}
Syntax: limit_req_whitelist geo_var_name=var_name geo_var_value=var_value
Default: -
Context: http, server, location
表示白名单,要协同geo模块进行工作,其中geo_var_name表示geo模块设置的变量名,而geo_var_value表示geo模块设置的变量值。比如:
geo $white_ip {
    ranges;
    default 0;
    127.0.0.1-127.0.0.255 1;
}

limit_req_whitelist geo_var_name=white_ip geo_var_value=1;
上面表示ip 127.0.0.1-127.0.0.255这个区间都会跳过limit_req的处理
Tengine+lua结合
参考博客:
https://blog.csdn.net/qq_27156945/article/details/104019069
https://www.cnblogs.com/yulibostu/articles/10529989.html
https://segmentfault.com/a/1190000014621318

官方网站: https://github.com/openresty/lua-nginx-module
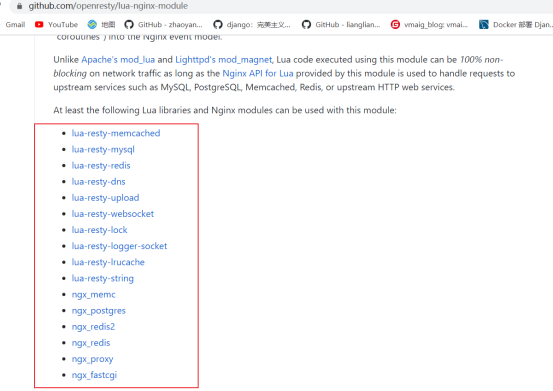

1、安装LUA环境->LuaJIT(源码安装)
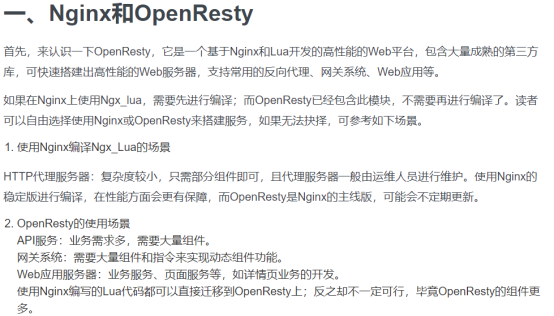
注意:让nginx支持lua,有两种方法:一是使用luajit即时编译器,二是使用lua编译器。推荐使用luajit,因为效率高
这里又有两种方案:(建议用2)
-
一是在luajit官网下载
-
二是用openresty提供的https://github.com/openresty/luajit2
cd /usr/local/
wget http://luajit.org/download/LuaJIT-2.0.2.tar.gz
tar -zxvf LuaJIT-2.0.2.tar.gz
cd LuaJIT-2.0.2
make install PREFIX=/usr/local/LuaJIT
#加入环境变量:
vim /etc/profile
export LUAJIT_LIB=/usr/local/LuaJIT/lib
export LUAJIT_INC=/usr/local/LuaJIT/include/luajit-2.0
source /etc/profile

# 加载lua库
echo "/usr/local/LuaJIT/lib" >> /etc/ld.so.conf
ldconfig
如果不用openresty提供的,那么就报这个错

从https://github.com/openresty/luajit2下载安装
git clone https://github.com/openresty/luajit2
cd luajit2
make
make install PREFIX=/usr/local/LuaJIT
#加入环境变量:
vim /etc/profile
export LUAJIT_LIB=/usr/local/LuaJIT/lib
export LUAJIT_INC=/usr/local/LuaJIT/include/luajit-2.1

source /etc/profile
2、下载并解压模块(版本保持和我的一致,否则保持) ngx_devel_kit和lua-nginx-module
ngx_devel_kit (NDK(nginx development kit)模块,是一个拓展nginx服务器核心功能的模块,第三方模块开发可以基于它来快速实现。https://github.com/vision5/ngx_devel_kit
lua-nginx-module 下载。可在 Nginx 中嵌入 Lua 语言,让 Nginx 可以支持 Lua 强大的语法
cd /usr/local
wget -c https://github.com/vision5/ngx_devel_kit/archive/v0.3.0.tar.gz
wget https://github.com/openresty/lua-nginx-module/archive/v0.10.15.tar.gz
wget -c https://github.com/openresty/lua-resty-memcached/archive/v0.15.zip

# 分别解压
tar xf v0.3.0.tar.gz
tar xf v0.10.15.tar.gz
3、重新编译编译Nginx 先停止nginx:
nginx -s stop
cd /usr/local/src/tengine-2.3.2
./configure \
--prefix=/usr/local/tengine232 \
--user=nginx \
--group=nginx \
--sbin-path=/usr/local/tengine232/sbin/nginx \
--conf-path=/usr/local/tengine232/conf/nginx.conf \
--http-log-path=/usr/local/tengine232/logs/access.log \
--error-log-path=/usr/local/tengine232/logs/error.log \
--pid-path=/usr/local/tengine232/run/nginx.pid \
--lock-path=/usr/local/tengine232/run/nginx.lock \
--with-http_ssl_module \
--with-http_secure_link_module \
--with-http_flv_module \
--with-http_gzip_static_module \
--with-http_mp4_module \
--with-http_gunzip_module \
--with-http_sub_module \
--with-http_stub_status_module \
--with-http_realip_module \
--with-pcre \
--with-stream \
--with-stream=dynamic \
--with-stream_ssl_module \
--with-stream_sni \
--with-stream_realip_module \
--with-stream_ssl_preread_module  \
--with-threads \
--with-file-aio \
--with-http_addition_module \
--with-http_dav_module \
--with-http_random_index_module \
--http-client-body-temp-path=/usr/local/tengine232/client_body_temp \
--http-proxy-temp-path=/usr/local/tengine232/proxy_temp \
--http-fastcgi-temp-path=/usr/local/tengine232/fastcgi_temp \
--http-uwsgi-temp-path=/usr/local/tengine232/uwsgi_temp \
--http-scgi-temp-path=/usr/local/tengine232/scgi_temp \
--with-cc-opt='-O2 -g -pipe -Wall -Wp,-D_FORTIFY_SOURCE=2 -fexceptions -fstack-protector-strong --param=ssp-buffer-size=4 -grecord-gcc-switches -m64 -mtune=generic -fPIC' \
--with-ld-opt='-Wl,-z,relro -Wl,-z,now -pie' \
--with-ld-opt="-Wl,-rpath,/usr/local/LuaJIT/lib/" \
--add-module=../nginx_upstream_check_module-master/ \
--add-module=/usr/local/src/ngx_devel_kit-0.3.0 \
--add-module=/usr/local/src/lua-nginx-module-0.10.15
#就是添加这些参数
--with-ld-opt='-Wl,-z,relro -Wl,-z,now -pie' \
--with-ld-opt="-Wl,-rpath,/usr/local/LuaJIT/lib/" \
--add-module=../nginx_upstream_check_module-master/ \
--add-module=/usr/local/src/ngx_devel_kit-0.3.0 \
--add-module=/usr/local/src/lua-nginx-module-0.10.15
注意哦:/usr/local/LuaJIT/lib就是$LUAJIT_LIB
make -j 4 && make install
4、加载lua库,加入到ld.so.conf文件
echo "/usr/local/LuaJIT/lib" >> /etc/ld.so.conf
# 然后执行如下命令:
ldconfig
5、查看是否已加载模块
nginx -V
6、启动报错

解决办法如下(2种方案)
这个问题到git上面看了 ,差不多是这个地方吧:https://github.com/openresty/lua-nginx-module/issues/1509
1、就是在nginx.conf 中的 http{}模块中加入下面这行代码:
lua_load_resty_core off;

或者:
警告如下:failed to load the 'resty.core' module 加载 resty.core 核心模块失败,然后下面还有十几行找不到文件的日志
cat /usr/local/tengine232/logs/error.log
2020/07/27 15:39:38 [notice] 12728#12728: signal process started
2020/07/27 15:39:38 [alert] 27311#27311: failed to load the 'resty.core' module (https://github.com/openresty/lua-resty-core); ensure you are using an OpenResty release from https://openresty.org/en/download.html (reason: module 'resty.core' not found:
    no field package.preload['resty.core']
    no file '/usr/local/tengine232/conf/waf/resty/core.lua'
    no file '/usr/local/tengine232/site/lualib/resty/core.so'
    no file '/usr/local/tengine232/lualib/resty/core.so'
    no file './resty/core.so'
    no file '/usr/local/lib/lua/5.1/resty/core.so'
    no file '/usr/local/openresty/luajit/lib/lua/5.1/resty/core.so'
    no file '/usr/local/lib/lua/5.1/loadall.so'
    no file '/usr/local/tengine232/site/lualib/resty.so'
    no file '/usr/local/tengine232/lualib/resty.so'
    no file './resty.so'
    no file '/usr/local/lib/lua/5.1/resty.so'
    no file '/usr/local/tengine232/luajit/lib/lua/5.1/resty.so'
    no file '/usr/local/lib/lua/5.1/loadall.so') in /usr/local/tengine232/conf/nginx.conf:130
2、上面告警是缺少 lua-resty-core 模块,从而找不到这些信息,所以我们要下载lua-resty-core模块然后引入到Openresty
git clone https://github.com/openresty/lua-resty-core.git
然后修改nginx配置文件来引入此模块,如下格式添加到第二行的后面
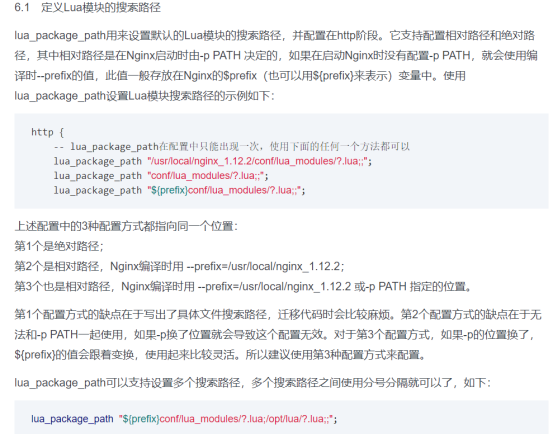
lua_package_path "/usr/local/LuaJIT/share/luajit-2.1.0-beta3/?.lua;/usr/local/LuaJIT/share/luajit-2.1.0-beta3/lua-resty-redis/lib/?.lua;;";
然后在报错

我们用的lua-nginx-module-0.10.17,可能还是版本高了的问题,还是要用v0.10.16一下,这里就用的lua-nginx-module-0.10.15
./sbin/nginx -V
./sbin/nginx
Tengine+lua来提供status服务
    server {
        listen 9092;
        server_name 192.168.137.50;
        location /nginx_status {
            set $stat "OK";
            content_by_lua '
                ngx.header.content_type = "text/plain";
                ngx.say(ngx.var.stat);
                ';
            access_log logs/status.access.log  main;
          }
    }
或者:
        location /nginx_status {
#设置文件使用的默认MIME-type,将会增加一个Content-Type:text/plain的响应头
            default_type 'text/plain';
            content_by_lua 'ngx.say("OK")';
        }
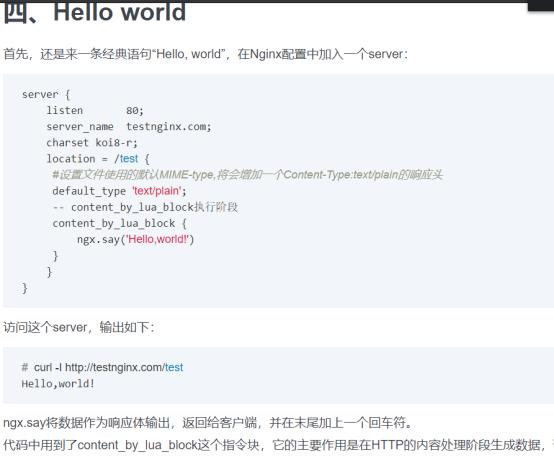
lua指令方式
#在server 中添加一个localtion
location /hello {
            default_type 'text/plain';
            content_by_lua 'ngx.say("hello, lua")';
}
lua文件方式
#在server 中添加一个localtion
location /lua {
    default_type 'text/html';
    content_by_lua_file conf/lua/test.lua; #相对于nginx安装目录
}
#conf/lua/test.lua文件内容
ngx.say("hello world");
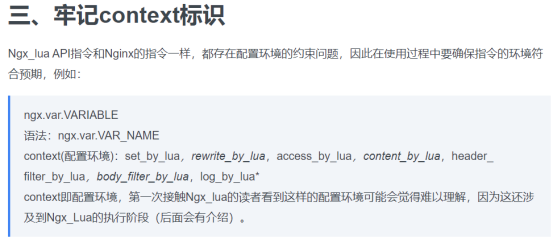
Lua-Nginx-Module常用指令
https://blog.51cto.com/xikder/2331336
https://blog.51cto.com/xikder/2331368
https://blog.51cto.com/xikder/2331504
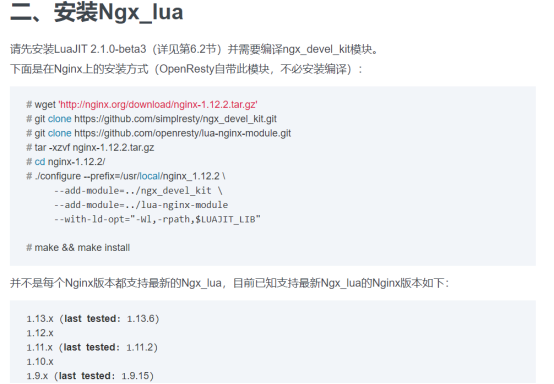
如需获取最新版本的支持动态,请参考https://github.com/openresty/lua-nginx-module# nginx-compatibility


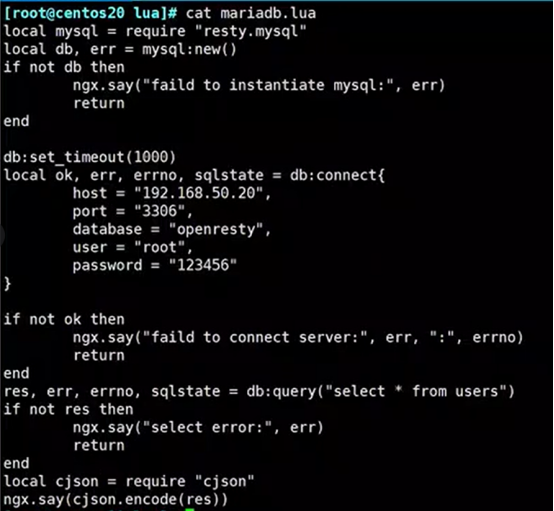
Tengine+lua+memcached灰度发布
https://blog.51cto.com/xikder/2331336
https://www.cnblogs.com/leigepython/p/12300844.html
在 Nginx 中访问 Memcached 有两种方式:mem-nginx-module 与 lua-resty-memcached。Openresty 可直接使用这两种方式进行访问。
参考:https://blog.csdn.net/panguangyuu/article/details/88878463
安装memcached
这里使用 memcache 来存储哪些ip要访问新的,哪些ip访问稳定的老的。
yum install memcached
memcached -u nobody -m 1024 -c 2048 -p 11211 -d
# 设置 灰度ip
telnet 127.0.0.1 11211
set 192.168.68.211 0 0 1
1
get 192.168.68.211
quit
注意:
set后第一个值为key值。
192.168.68.211这是key值是需要灰度测试的IP地址(就是客户端的IP地址);
0 表示一个跟该key有关的自定义数据;
3600 表示该key值的有效时间;(0:永不过期,单位为秒)
1 表示key所对应的value值的字节数
quit表示退出连接
安装lua-resty-memcached
参考: https://github.com/openresty/lua-resty-memcached
注意事项:
a、使用本库不能用在 init_by_lua 、set_by_lua 、log_by_lua 、header_filter_by_lua 上下文中
b、resty.mysql 不能存放在模块级的变量中(其他例程会分享),只能存放在局部变量或ngx.ctxtable中
wget https://github.com/openresty/lua-resty-memcached/archive/v0.15.tar.gz
tar -zxvf v0.15.tar.gz -C /usr/local/src/
cp -r /usr/local/src/lua-resty-memcached-0.15/lib/resty /usr/local/LuaJIT/share/luajit-2.1.0-beta3/
说明:这里位置要确认好,等会nginx 配置文件中http部分要引用

以后所有的lua模块文件都放在/usr/local/LuaJIT/share/luajit-2.1.0-beta3/resty目录下面
参考:https://blog.51cto.com/xikder/2331336
Nginx配置文件如下:
    lua_load_resty_core off;
    #lua_package_path "/usr/local/LuaJIT/share/?.lua;;";
    lua_package_path "/usr/local/LuaJIT/share/luajit-2.1.0-beta3/?.lua;;";
    upstream client {
        server   127.0.0.1:8880;
    }
    upstream client_test {
        server   127.0.0.1:9990;
    }
    server {
      listen       80;
      server_name  localhost;
       location / {
       content_by_lua '
            --获取x-real-ip
            clientIP = ngx.req.get_headers()["X-Real-IP"]
            --如果IP为空-取x_forwarded_for
            if clientIP == nil then
                clientIP = ngx.req.get_headers()["x_forwarded_for"]
            end
            --如果IP为空-取remote_addr
            if clientIP == nil then
                clientIP = ngx.var.remote_addr
            end
                -- 定义本地,加载memcached
                local memcached = require "resty.memcached"
                --实例化对象
                local memc, err = memcached:new()
                --判断连接是否存在错误
                if not memc then
                    ngx.say("failed to instantiate memc: ", err)
                    return
                end

                -- 设置超时时间(-1sec)
                memc:set_timeout(1000)

                -- 建立memcache连接
                local ok, err = memc:connect("127.0.0.1", 11211)
                if not ok then
                    ngx.say("failed to connect: ", err)
                    return
                end
                -- 获取对象中的ip,如果存在值赋给res
                local res, flags, err = memc:get(clientIP)
                if err then
                    ngx.say("failed to get clientIP ", err)
                    return
                end
                --如果值为1,则调用@client_test
                if res == "1" then
                    ngx.exec("@client_test")
                    return
                end
                -- 否则调用
                    ngx.exec("@client")
               ';
        }
        location @client{
            proxy_pass http://client;
        }
        location @client_test{
            proxy_pass http://client_test;
        }

    }
默认是访问的是client 这个upstream。
正常访问时:

设置灰度发布访问:

再次访问:

Tengine+lua+redis灰度发布
https://www.cnblogs.com/tinywan/p/6534151.html
https://www.infvie.com/ops-notes/canary-deployment.html
http://www.dczou.com/viemall/873.html
https://www.cnblogs.com/Eivll0m/p/6774622.html
https://www.cnblogs.com/ph7seven/p/9941189.html
使用Redis做分布式缓存;使用lua API来访问redis缓存;使用nginx向客户端提供服务,ngx_lua将lua嵌入到nginx,让nginx执行lua脚本,高并发,非阻塞的处理各种请求。url请求nginx服务器,然后lua查询redis,返回json数据
redis2-nginx-module和lua-resty-redis
redis2-nginx-module是一个openresty(1.9.15.1)自带的模块。它能够把请求转发给upstream(redis2_pass)。注意它和lua-resty-redis不同,lua-resty-redis是一个lua语言版的redis API,使用socket(lua sock)和redis通信。而redis2-nginx-module是把请求转发给别的upstream
下载库
1、下载ngx_devel_kit (NDK(nginx development kit)模块,是一个拓展nginx服务器核心功能的模块,第三方模块开发可以基于它来快速实现。
wget https://github.com/simpl/ngx_devel_kit/archive/v0.3.0.tar.gz
tar -zxvf v0.3.0.tar.gz
2、lua-nginx-module 下载。可在 Nginx 中嵌入 Lua 语言,让 Nginx 可以支持 Lua 强大的语法。
wget https://github.com/openresty/lua-nginx-module/archive/v0.10.7.tar.gz
tar -zxvf v0.10.7.tar.gz
3、redis2-nginx-module 下载。是一个支持 Redis 2.0 协议的 Nginx upstream 模块,它可以让 Nginx 以非阻塞方式直接防问远方的 Redis 服务,同时支持 TCP 协议和 Unix Domain Socket 模式,并且可以启用强大的 Redis 连接池功能。
wget https://github.com/openresty/redis2-nginx-module/archive/v0.15.tar.gz
tar -zxvf v0.15.tar.gz
4、set-misc-nginx-module 下载。是标准的HttpRewriteModule指令的扩展,提供更多的功能,如URI转义与非转义、JSON引述,Hexadecimal、MD5、SHA1、Base32、Base64编码与解码、随机数等等
wget https://github.com/openresty/set-misc-nginx-module/archive/v0.31.tar.gz
tar -zxvf v0.31.tar.gz
5、echo-nginx-module 下载,是一个 Nginx 模块,提供直接在 Nginx 配置使用包括 "echo", "sleep", "time" 等指令。
wget https://github.com/openresty/echo-nginx-module/archive/v0.62.tar.gz
tar -zxvf v0.62.tar.gz
重新编译tengine
到你的源码目录内,先make clean 然后./config ...
./configure \
--prefix=/usr/local/tengine232 \
--user=nginx \
--group=nginx \
--sbin-path=/usr/local/tengine232/sbin/nginx \
--conf-path=/usr/local/tengine232/conf/nginx.conf \
--http-log-path=/usr/local/tengine232/logs/access.log \
--error-log-path=/usr/local/tengine232/logs/error.log \
--pid-path=/usr/local/tengine232/run/nginx.pid \
--lock-path=/usr/local/tengine232/run/nginx.lock \
--with-http_ssl_module \
--with-http_secure_link_module \
--with-http_flv_module \
--with-http_gzip_static_module \
--with-http_mp4_module \
--with-http_gunzip_module \
--with-http_sub_module \
--with-http_stub_status_module \
--with-http_realip_module \
--with-pcre \
--with-stream \
--with-stream=dynamic \
--with-stream_ssl_module \
--with-stream_sni \
--with-stream_realip_module \
--with-stream_ssl_preread_module  \
--with-threads \
--with-file-aio \
--with-http_addition_module \
--with-http_dav_module \
--with-http_random_index_module \
--http-client-body-temp-path=/usr/local/tengine232/client_body_temp \
--http-proxy-temp-path=/usr/local/tengine232/proxy_temp \
--http-fastcgi-temp-path=/usr/local/tengine232/fastcgi_temp \
--http-uwsgi-temp-path=/usr/local/tengine232/uwsgi_temp \
--http-scgi-temp-path=/usr/local/tengine232/scgi_temp \
--with-cc-opt='-O2 -g -pipe -Wall -Wp,-D_FORTIFY_SOURCE=2 -fexceptions -fstack-protector-strong --param=ssp-buffer-size=4 -grecord-gcc-switches -m64 -mtune=generic -fPIC' \
--with-ld-opt='-Wl,-z,relro -Wl,-z,now -pie' \
--with-ld-opt="-Wl,-rpath,/usr/local/LuaJIT/lib/" \
--add-module=../nginx_upstream_check_module-master/ \
--add-module=/usr/local/src/ngx_devel_kit-0.3.0 \
--add-module=/usr/local/src/lua-nginx-module-0.10.15 \
--add-module=/usr/local/src/echo-nginx-module-0.62 \
--add-module=/usr/local/src/redis2-nginx-module-0.15 \

make && make install
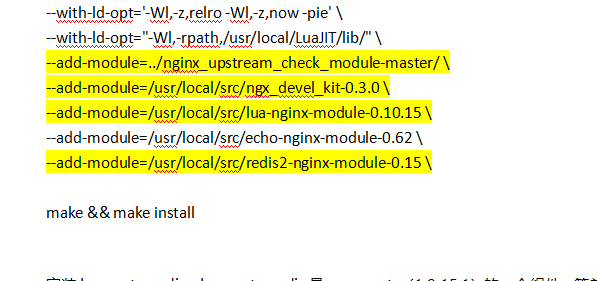
安装lua-resty-redis,lua-resty-redis是openresty(1.9.15.1)的一个组件,简单来说,它提供一个lua语言版的redis API,使用socket(lua sock)和redis通信。
下载源码包:
git clone https://github.com/openresty/lua-resty-redis.git
移动该源码包到/usr/local/LuaJIT/share/luajit-2.1.0-beta3/这里去
mv lua-resty-redis/ /usr/local/LuaJIT/share/luajit-2.1.0-beta3/
更新lua_package_path:
lua_package_path "/usr/local/LuaJIT/share/luajit-2.1.0-beta3/?.lua;/usr/local/LuaJIT/share/luajit-2.1.0-beta3/lua-resty-redis/lib/?.lua;;";

然后在配置nginx.conf
http {
    lua_load_resty_core off;
    lua_package_path "/usr/local/LuaJIT/share/luajit-2.1.0-beta3/?.lua;/usr/local/LuaJIT/share/luajit-2.1.0-beta3/lua-resty-redis/lib/?.lua;;";
    upstream client {
        server   127.0.0.1:8088;
    }
    upstream client_test {
        server   127.0.0.1:7777;
    }
    server {
        listen       80;
        server_name  localhost;
        proxy_ignore_client_abort on;
        proxy_set_header X-Real-IP $remote_addr;
        proxy_set_header X-Forwarded-For $proxy_add_x_forwarded_for;
        proxy_set_header Host $http_host:$server_port;
        proxy_set_header X-NginX-Proxy true;
        proxy_redirect off;
        location / {
            default_type 'text/html';
            lua_code_cache off;
            #为每个请求执行gray.lua脚本
            content_by_lua_file conf/gray.lua;
        }
        location @client {
            proxy_pass http://client;
        }
        location @client_test {
            proxy_pass http://client_test;
        }
   }
}
# cat conf/gray.lua
-- 引入redis
local redis=require "resty.redis"
-- 创建一个redis对象实例。在失败,返回nil和描述错误的字符串的情况下
local red=redis:new()
--设置后续操作的超时(以毫秒为单位)保护,包括connect方法
red:set_timeout(1000);
--尝试连接到redis服务器正在侦听的远程主机和端口
local ok,err=red:connect("127.0.0.1", 6379)
if not ok then
    ngx.say("failed to connect redis ",err)
    return
end
--Redis身份验证(根据实际情况来填写)
local auth,err = red:auth("qwe!@#43211")
if not auth then
    ngx.say("failed to authenticate : ",err)
end

--获取请求ip
local local_ip = ngx.req.get_headers()["X-Real-IP"]
if local_ip == nil then
    local_ip = ngx.req.get_headers()["x_forwarded_for"]
end
if local_ip == nil then
    local_ip = ngx.var.remote_addr
end
--redis中获取白名单
local intercept = red:get(local_ip)
--判断是否在白名单然后转到对应服务
if intercept == local_ip then
    ngx.exec("@client_test")
    return
end
ngx.exec("@client")
-- 关闭连接
local ok, err = red:close()
if not ok then
    ngx.say("failed to close:", err)
    return
end
===================================
-- 第二种处理方式
--redis中获取白名单
--local ip_lists=red:get("gray");
----判断是否在白名单然后转到对应服务
--if string.find(ip_lists,local_ip) == nil then
--  ngx.exec("@prod1");
--  else
--    ngx.exec("@prod2");
--    end
--    local ok,err=red:close()


-- 关闭redis连接的函数写法
local function close_redis(redis_instance)
    if not redis_instance then
        return
    end
    local ok,err = redis_instance:close();
    if not ok then
        ngx.say("close redis error : ",err);
    end
end
Reload nginx:

警告:这个alert是因为objstore.conf中把lua_code_cache为off;若设置为off,nginx不缓存lua脚本,每次改变lua代码,不必reload nginx即可生效;这便于开发和测试。但禁用缓存对性能有影响,故正式环境下一定记得设置为on;
注意:
如通过lua连接redis出错,redis配置注释掉bind 127.0.0.1、设置protected-mode 为no;
测试:redis的key 、value相同则走@client_test,否则走@client
默认是线上环境
在Redis存入客户端IP,默认是db0。所有必须写入其他库不能成功的哈(亦指定IP访问预发布环境)
# redis-cli
127.0.0.1:6379> AUTH qwe!@#43211
OK
127.0.0.1:6379[10]> KEYS *
(empty list or set)
127.0.0.1:6379[10]> SET 54.254.74.214 54.254.74.214
OK
127.0.0.1:6379[10]> KEYS *
1) "54.254.74.214"
然后在这个IP上54.254.74.214访问网站就是预发布环境
Tengin+lua+memcached实现IP限流(防刷注册)
参考:
https://www.cnblogs.com/zyy1688/p/10985565.html
http://bbs.linuxtone.org/thread-22666-1-1.html
https://www.jianshu.com/p/5f9928c7d730
目前使用了nginx + lua +memcached的方法 运维就可以直接替代程序 来做一些工作 ,可以在程序没有更新之前做一些简单的防刷,目前数据过期时间设置的是1分钟 意味着最多封停这个IP一分钟 , 也可以直接写iptables脚本进行封IP 需要准备的是:
- nginx 的lua支持 memcache支持
- memcached一只
大致配置如下:
server {
    listen       80;
    server_name  localhost;
    set $count '';
    location /test/ {
        default_type text/html;
                 access_by_lua '
                    local memcached = require "resty.memcached"
                    local memc, err = memcached:new()
                    if not memc then
                        return
                    end
                    memc:set_timeout(1000)
                    local ok, err = memc:connect("127.0.0.1", 11211)
                    if not ok then
                        return
                    end
                    local res, flags, err = memc:get(ngx.var.binary_remote_addr)
                    if  not res then
                        local ok, err = memc:set(ngx.var.binary_remote_addr, 1,60)
                    else
                        local newvalue,err = memc:incr(ngx.var.binary_remote_addr, 1)
                    end
                    ngx.var.count=res
                    local res = tonumber(res) or 0
                    if res > 50 then
                    ngx.exit(ngx.HTTP_FORBIDDEN)
                    end
                    memc:set_keepalive(0, 100)
                ';
        content_by_lua '
            ngx.say("If you vist this page over 50 times per minute,You will be forbiddened,Current Count is:",ngx.var.count)';

    }
}
Tengin+lua+redis实现IP限流(防刷注册)
参考:
https://www.cnblogs.com/zyy1688/p/10985565.html
https://www.jianshu.com/p/5f9928c7d730
http://bbs.linuxtone.org/thread-22666-1-1.html
配置 lua 脚本:
# cat conf/access_by_redis.lua
local function close_redis(red)
    if not red then
        return
    end
    -- 释放连接(连接池实现),毫秒
    local pool_max_idle_time = 10000
    -- 连接池大小
    local pool_size = 100
    local ok, err = red:set_keepalive(pool_max_idle_time, pool_size)
    local log = ngx_log
    if not ok then
        log(ngx_ERR, "set redis keepalive error : ", err)
    end
end
-- 连接redis
local redis = require('resty.redis')
local red = redis.new()
red:set_timeout(1000)


local ip = "127.0.0.1"
local port = "6379"
local ok, err = red:connect(ip,port)
if not ok then
    return close_redis(red)
end
red:auth('qwe!@#43211')
red:select('0')

local clientIP = ngx.req.get_headers()["X-Real-IP"]
if clientIP == nil then
   clientIP = ngx.req.get_headers()["x_forwarded_for"]
end
if clientIP == nil then
    clientIP = ngx.var.remote_addr
end

local incrKey = "user:"..clientIP..":freq"
local blockKey = "user:"..clientIP..":block"

local is_block,err = red:get(blockKey) -- check if ip is blocked
if tonumber(is_block) == 1 then
    ngx.exit(403)
    close_redis(red)
end

inc  = red:incr(incrKey)
if inc < 10 then
   inc = red:expire(incrKey,1)
end
-- 每秒10次以上访问即视为非法,会阻止1分钟的访问
if inc > 10 then
    --设置block 为 True 为1
    red:set(blockKey,1)
    red:expire(blockKey,60)
end
close_redis(red)
配置nginx配置文件:
    server {
        listen 80;
        server_name localhost;
        location / {
            default_type text/html;
            access_by_lua_file "conf/access_by_redis.lua";
            root html/6666;
            index index.html;
        }
    }
利用ab进行测试:
ab -n 10 -c 10 localhost/index.html
ab -t 1 -n 20 -c 10 localhost/index.html
Tengine+lua实现WAF防火墙功能
参考:
原文地址:https://abcops.cn/1732.html
https://mp.weixin.qq.com/s/fLaNHRCCA6rjYNdS3ww6IA
https://article.itxueyuan.com/nWoopn
https://www.jianshu.com/p/bffbd9bc4c53
https://github.com/unixhot/waf
https://github.com/loveshell/ngx_lua_waf/
什么是WAF
Web应用防护系统(也称为:网站应用级入侵防御系统。英文:Web Application Firewall,简称:WAF)。利用国际上公认的一种说法:Web应用防火墙是通过执行一系列针对HTTP/HTTPS的安全策略来专门为Web应用提供保护的一款产品
实现WAF
实现WAF的方式有两种:(建议用OpenResty)
- 使用nginx+lua来实现WAF,须在编译nginx的时候配置上lua
- 部署OpenResty,不需要在编译nginx的时候指定lua
这里我们采用的是第一种
WAF一句话描述,就是解析HTTP请求(协议解析模块),规则检测(规则模块),做不同的防御动作(动作模块),并将防御过程(日志模块)记录下来。所以本文中的WAF的实现由五个模块(配置模块、协议解析模块、规则模块、动作模块、错误处理模块)组成
WAF的功能
- 支持IP白名单和黑名单功能,直接将黑名单的IP访问拒绝。
-
支持URL白名单,将不需要过滤的URL进行定义。
-
支持User-Agent的过滤,匹配自定义规则中的条目,然后进行处理(返回403)。
- 支持CC攻击防护,单个URL指定时间的访问次数,超过设定值,直接返回403。
-
支持Cookie过滤,匹配自定义规则中的条目,然后进行处理(返回403)。
-
支持URL过滤,匹配自定义规则中的条目,如果用户请求的URL包含这些,返回403。
-
支持URL参数过滤,原理同上。
-
持日志记录,将所有拒绝的操作,记录到日志中去。
- 日志记录为JSON格式,便于日志分析,例如使用ELKStack进行攻击日志收集、存储、搜索和展示
WAF作用
-
防止sql注入,本地包含,部分溢出,fuzzing测试,xss,SSRF等web攻击
-
防止svn/备份之类文件泄漏
-
防止ApacheBench之类压力测试工具的攻击
-
屏蔽常见的扫描黑客工具,扫描器
-
屏蔽异常的网络请求
-
屏蔽图片附件类目录php执行权限
-
防止webshell上传
实现WAF的部署方式
第一种:部署tengine+lua
参考Tengine+lua结合 或者参考:https://github.com/unixhot/waf
Nginx安装必备的Nginx和PCRE软件包。
[root@nginx-lua ~]# cd /usr/local/src
[root@nginx-lua src]# wget http://nginx.org/download/nginx-1.12.1.tar.gz
[root@nginx-lua src]# wget https://nchc.dl.sourceforge.net/project/pcre/pcre/8.41/pcre-8.41.tar.gz
其次,下载当前最新的luajit和ngx_devel_kit (NDK),以及春哥(章)编写的lua-nginx-module
[root@nginx-lua src]# wget http://luajit.org/download/LuaJIT-2.0.5.tar.gz
[root@nginx-lua src]# wget https://github.com/simpl/ngx_devel_kit/archive/v0.3.0.tar.gz
[root@nginx-lua src]# wget wget https://github.com/chaoslawful/lua-nginx-module/archive/v0.10.10.zip
最后,创建Nginx运行的普通用户
[root@nginx-lua src]# useradd -s /sbin/nologin -M www
解压NDK和lua-nginx-module
[root@openstack-compute-node5 src]# tar zxvf v0.3.0.tar.gz
[root@openstack-compute-node5 src]# unzip -q v0.10.10.zip
安装LuaJIT Luajit是Lua即时编译器。
[root@webs-ebt src]# tar zxvf LuaJIT-2.0.5.tar.gz
[root@webs-ebt src]# cd LuaJIT-2.0.5
[root@webs-ebt LuaJIT-2.0.5]# make && make install
安装Nginx并加载模块
[root@webs-ebt src]# tar zxf nginx-1.12.1.tar.gz
[root@webs-ebt src]# tar zxvf pcre-8.41.tar.gz
[root@webs-ebt src]# cd nginx-1.12.1
[root@webs-ebt nginx-1.12.1]# export LUAJIT_LIB=/usr/local/lib
[root@webs-ebt nginx-1.12.1]# export LUAJIT_INC=/usr/local/include/luajit-2.0
[root@webs-ebt nginx-1.12.1]#./configure --user=www --group=www --prefix=/usr/local/nginx-1.12.1/ --with-pcre=/usr/local/src/pcre-8.41 --with-http_stub_status_module --with-http_sub_module --with-http_gzip_static_module --without-mail_pop3_module --without-mail_imap_module --without-mail_smtp_module  --add-module=../ngx_devel_kit-0.3.0/ --add-module=../lua-nginx-module-0.10.10/
[root@webs-ebt nginx-1.12.1]# make -j2 && make install
[root@webs-ebt nginx-1.12.1]# ln -s /usr/local/nginx-1.12.1 /usr/local/nginx
[root@webs-ebt nginx-1.12.1]# ln -s /usr/local/lib/libluajit-5.1.so.2 /lib64/libluajit-5.1.so.2
如果不创建符号链接,可能出现以下异常:
error while loading shared libraries: libluajit-5.1.so.2: cannot open shared object file: No such file or directory
测试安装
安装完毕后,下面可以测试安装了,修改nginx.conf 增加第一个配置。
        location /hello {
                default_type 'text/plain';
                content_by_lua 'ngx.say("hello,lua")';
        }
[root@webs-ebt src]# /usr/local/nginx/sbin/nginx -t
[root@webs-ebt src]# /usr/local/nginx/sbin/nginx -t
然后访问http://xxx.xxx.xxx.xxx/hello 如果出现hello,lua。表示安装完成,然后就可以
第二种:OpenResty部署(建议用OpenResty)
安装依赖软件包
[root@opsany ~]# yum install -y readline-devel pcre-devel openssl-devel
下载并编译安装OpenResty
[root@opsany ~]# cd /usr/local/src
[root@opsany src]# wget https://openresty.org/download/openresty-1.17.8.2.tar.gz
[root@opsany src]# tar zxf openresty-1.17.8.2.tar.gz
[root@opsany src]# cd openresty-1.17.8.2
[root@opsany openresty-1.17.8.2]# ./configure --prefix=/usr/local/openresty-1.17.8.2 \
--with-luajit --with-http_stub_status_module \
--with-pcre --with-pcre-jit \
--with-file-aio --with-threads
[root@opsany openresty-1.17.8.2]# gmake && gmake install
[root@opsany openresty-1.17.8.2]# cd
[root@opsany ~]# ln -s /usr/local/openresty-1.17.8.2/ /usr/local/openresty
测试OpenResty和运行Lua
[root@opsany ~]# vim /usr/local/openresty/nginx/conf/nginx.conf
#在默认的server配置中增加
        location /hello {
            default_type text/html;
            content_by_lua_block {
                ngx.say("<p>hello, world</p>")
            }
        }
[root@opsany ~]# /usr/local/openresty/nginx/sbin/nginx -t
nginx: the configuration file /usr/local/openresty-1.17.8.2/nginx/conf/nginx.conf syntax is ok
nginx: configuration file /usr/local/openresty-1.17.8.2/nginx/conf/nginx.conf test is successful
[root@opsany ~]# /usr/local/openresty/nginx/sbin/nginx
测试访问
[root@opsany ~]# curl http://127.0.0.1/hello
<p>hello, world</p>
部署WAF
WAF已经有人通过lua写出了这个开源的功能,在此直接拿来用即可。
GitHub地址:https://github.com/unixhot/waf
1.下载waf模块
git clone https://github.com/unixhot/waf.git
cp -a ./waf/waf/ /usr/local/tengine232/conf/
2.waf文件介绍
# ll /usr/local/tengine232/conf/waf/
total 20
-rw-r--r-- 1 root root  408 Nov  6 19:23 access.lua
-rw-r--r-- 1 root root 1279 Nov  6 19:23 config.lua
-rw-r--r-- 1 root root 5473 Nov  6 19:23 init.lua
-rw-r--r-- 1 root root 2253 Nov  6 19:23 lib.lua
drwxr-xr-x 2 root root  158 Nov  6 19:23 rule-config
以上access.lua、lib.lua、init.lua都是功能实现的lua代码,如果不具备lua的开发能力,我们一般不会去进行改动。
config.lua为各个功能的配置文件
rule-config目录存放了各种防御策略规则 我们需要经常改动config.lua和存储策略的文件
# ll /usr/local/tengine232/conf/waf/rule-config/
total 24
-rw-r--r-- 1 root root 749 Nov  6 19:23 args.rule       #异常Get参数策略文件
-rw-r--r-- 1 root root   0 Nov  6 19:23 blackip.rule    #IP黑名单策略文件
-rw-r--r-- 1 root root 652 Nov  6 19:23 cookie.rule     #Cookie策略文件
-rw-r--r-- 1 root root 739 Nov  6 19:23 post.rule       #异常POST参数策略文件
-rw-r--r-- 1 root root 307 Nov  6 19:23 url.rule        #异常URL策略文件
-rw-r--r-- 1 root root 173 Nov  6 19:23 useragent.rule  #异常UserAgent策略文件
-rw-r--r-- 1 root root   0 Nov  6 19:23 whiteip.rule    #IP白名单策略文件
-rw-r--r-- 1 root root   6 Nov  6 19:23 whiteurl.rule   #白名单URL策略文件
Tengine引入WAF模块
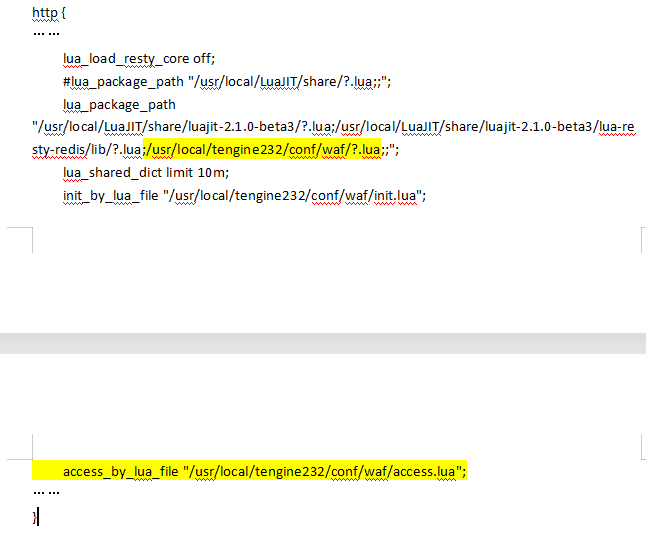
1.修改nginx配置来引入WAF模块(这里是全局配置,你也可以配置在单独的虚拟主机中)
如下在Nginx中加入以下配置来引入WAF模块(路径必须写正确)
http {
……
    lua_load_resty_core off; #ngx_lua v0.10.16就不能忽略resty_core模块了
    #lua_package_path "/usr/local/LuaJIT/share/?.lua;;";
    lua_package_path "/usr/local/LuaJIT/share/luajit-2.1.0-beta3/?.lua;/usr/local/LuaJIT/share/luajit-2.1.0-beta3/lua-resty-redis/lib/?.lua;/usr/local/tengine232/conf/waf/?.lua;;";
    lua_shared_dict limit 10m;
    init_by_lua_file "/usr/local/tengine232/conf/waf/init.lua";
    access_by_lua_file "/usr/local/tengine232/conf/waf/access.lua";
……
}
2.重启tengine
3.查看nginx error.log
警告如下:failed to load the 'resty.core' module 加载 resty.core 核心模块失败,然后下面还有十几行找不到文件的日志
cat /usr/local/tengine232/logs/error.log
2020/07/27 15:39:38 [notice] 12728#12728: signal process started
2020/07/27 15:39:38 [alert] 27311#27311: failed to load the 'resty.core' module (https://github.com/openresty/lua-resty-core); ensure you are using an OpenResty release from https://openresty.org/en/download.html (reason: module 'resty.core' not found:
    no field package.preload['resty.core']
    no file '/usr/local/tengine232/conf/waf/resty/core.lua'
    no file '/usr/local/tengine232/site/lualib/resty/core.so'
    no file '/usr/local/tengine232/lualib/resty/core.so'
    no file './resty/core.so'
    no file '/usr/local/lib/lua/5.1/resty/core.so'
    no file '/usr/local/openresty/luajit/lib/lua/5.1/resty/core.so'
    no file '/usr/local/lib/lua/5.1/loadall.so'
    no file '/usr/local/tengine232/site/lualib/resty.so'
    no file '/usr/local/tengine232/lualib/resty.so'
    no file './resty.so'
    no file '/usr/local/lib/lua/5.1/resty.so'
    no file '/usr/local/tengine232/luajit/lib/lua/5.1/resty.so'
    no file '/usr/local/lib/lua/5.1/loadall.so') in /usr/local/tengine232/conf/nginx.conf:130
4.解决办法如下(2种方案)
方案1、上面告警是缺少 lua-resty-core 模块,从而找不到这些信息,所以我们要下载lua-resty-core模块然后引入到Openresty
git clone https://github.com/openresty/lua-resty-core.git
然后修改nginx配置文件来引入此模块,如下格式添加到第二行lua_package_path的后面
    lua_shared_dict limit 10m;
    lua_package_path "/usr/local/LuaJIT/share/luajit-2.1.0-beta3/?.lua;/usr/local/LuaJIT/share/luajit-2.1.0-beta3/lua-resty-redis/lib/?.lua;/usr/local/tengine232/conf/waf/?.lua;;";
    init_by_lua_file "/usr/local/tengine232/conf/waf/init.lua";
    access_by_lua_file "/usr/local/tengine232/conf/waf/access.lua";
方案2、在nginx配置文件关闭这个.nginx: [warn] lua_load_resty_core is deprecated (the lua-resty-core library is required since ngx_lua v0.10.16) in /usr/local/openresty/nginx/conf/nginx.conf:32
lua_load_resty_core off;
5.然后保存退出重启看日志
nginx -t && nginx-s reload
确保日志无异常后则成功引入WAF模块
6.最后修改/usr/local/tengine232/conf/waf/config.lua文件中的config_rule_dir
config_rule_dir = "/usr/local/tengine232/conf/waf/rule-config"
WAF模块配置文件详解
来学习一下waf/config.lua配置文件中的内容
# cat /usr/local/tengine232/conf/waf/config.lua
--WAF config file,enable = "on",disable = "off"

--waf status
config_waf_enable = "on"
--log dir
config_log_dir = "/tmp"
--rule setting
config_rule_dir = "/usr/local/tengine232/conf/waf/rule-config"
--enable/disable white url
config_white_url_check = "on"
--enable/disable white ip
config_white_ip_check = "on"
--enable/disable block ip
config_black_ip_check = "on"
--enable/disable url filtering
config_url_check = "on"
--enalbe/disable url args filtering
config_url_args_check = "on"
--enable/disable user agent filtering
config_user_agent_check = "on"
--enable/disable cookie deny filtering
config_cookie_check = "on"
--enable/disable cc filtering
config_cc_check = "on"
--cc rate the xxx of xxx seconds
config_cc_rate = "10/60"
--enable/disable post filtering
config_post_check = "on"
--config waf output redirect/html
config_waf_output = "html"
--if config_waf_output ,setting url
config_waf_redirect_url = "https://www.unixhot.com"
config_output_html=[[
<html>
<head>
<meta http-equiv="Content-Type" content="text/html; charset=utf-8" />
<meta http-equiv="Content-Language" content="zh-cn" />
<title>OpsAny|Web应用防火墙</title>
</head>
<body>
<h1 align="center"> 欢迎白帽子进行授权安全测试,安全漏洞请联系QQ:57459267
</body>
</html>
]]
详解:
--lua文件中,--为行注释,
--[[
这是块注释
--]]

config_waf_enable = "on"        --是否启用waf模块,值为 on 或 off
config_log_dir = "/tmp"         --waf的日志位置,日志格式默认为json
config_rule_dir = "/usr/local/tengine232/conf/waf/rule-config" --策略规则目录位置,根据情况变动
config_white_url_check = "on"   --是否开启URL检测
config_white_ip_check = "on"    --是否开启IP白名单检测
config_black_ip_check = "on"    --是否开启IP黑名单检测
config_url_check = "on"         --是否开启URL过滤
config_url_args_check = "on"    --是否开启Get参数过滤
config_user_agent_check = "on"  --是否开启UserAgent客户端过滤
config_cookie_check = "on"      --是否开启cookie过滤
config_cc_check = "on"          --是否开启cc攻击过滤
config_cc_rate = "10/60"        --cc攻击的速率/时间,单位为秒;默认示例中为单个IP地址在60秒内访问同一个页面次数超过10次则认为是cc攻击,则自动禁止此IP地址访问此页面60秒,60秒后解封(封禁过程中此IP地址依然可以访问其它页面,如果同一个页面访问次数超过10次依然会被禁止)
config_post_check = "on"        --是否开启POST检测
config_waf_output = "html"      --对于违反规则的请求则跳转到一个自定义html页面还是指定页面,值为 html 和 redirect。
config_waf_redirect_url = "https://www.unixhot.com"     --指定违反请求后跳转的指定html页面

--指定违反规则后跳转的自定义html页面
config_output_html=[[
<html>
<head>
<meta http-equiv="Content-Type" content="text/html; charset=utf-8" />
<meta http-equiv="Content-Language" content="zh-cn" />
<title>网站防火墙</title>
</head>
<body>
<h1 align="center"> 欢迎白帽子进行授权安全测试,安全漏洞请联系QQ:1111111。
</body>
</html>
]]
备注:不要乱动双引号,区分大小写
IP黑名单配置
需要在config.lua中开启config_black_ip_check = "on"参数 IP黑名单配置非常简单,这个与Nginx的ngx_http_access_module模块原理是一致的,只需要把拒绝的地址加入到 waf/rule-config/blackip.rule文件中即可
cat /usr/local/tengine232/conf/waf/rule-config/blackip.rule
这里会报错(没有cjson模块,因此我们就要安装cjson。这个模块是日志模块,应该可以把日志输出注释掉也可以,不够这里没有试过哈。所有建议用openresty,就不用担心确某些模块了):

参考:https://yuekang.org.cn/2018/11/14/2018111401/
lua-cjson安装
wget https://www.kyne.com.au/~mark/software/download/lua-cjson-2.1.0.tar.gz
tar zxvf lua-cjson-2.1.0.tar.gz
cd lua-cjson-2.1.0
vim Makefile
# 修改为正确的路径(路径后不要留空格!!)
PREFIX =            /usr/local/LuaJIT
LUA_INCLUDE_DIR =   $(PREFIX)/include/luajit-2.1
# 然后在编译:
make install
最后在nginx配置文件加上导入模块的命令:
lua_package_cpath "/usr/local/LuaJIT/lib/lua/5.1/?.so;;";

然后在访问
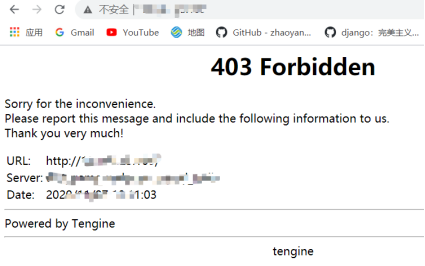
Waf日志:

已json格式输出

IP白名单配置
需要在config.lua中开启config_white_ip_check = "on"参数 IP白名单与黑名单相反,添加到IP白名单中的IP不受WAF限制,具体请自行测试
cat /usr/local/tengine232/conf/waf/rule-config/whiteip.rule
CC攻击过滤
需要在config.lua中开启
config_cc_check = "on"参数,然后指定config_cc_rate = "10/60"速率和时间 CC攻击只需要在config.lua配置文件中指定上面的两个参数即可如下指定在60秒内对于单个IP地址访问单个页面的次数最大10次,超过10次则自动拉入黑名单,60秒后自动解除
cat /usr/local/tengine232/conf/waf/config.lua
--enable/disable cc filtering
config_cc_check = "on"
--cc rate the xxx of xxx seconds
config_cc_rate = "10/60"
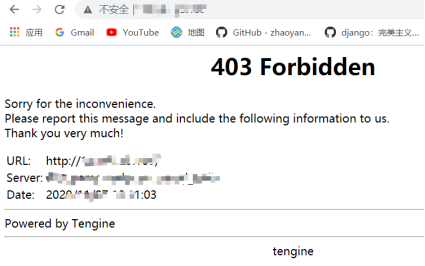
然后进行测试,如下刷新10次以后就变为来403
我们换个页面再次刷新,如下换个页面可以正常访问,不过连续对一个页面60秒内刷新10次以后将也被拉入黑名单
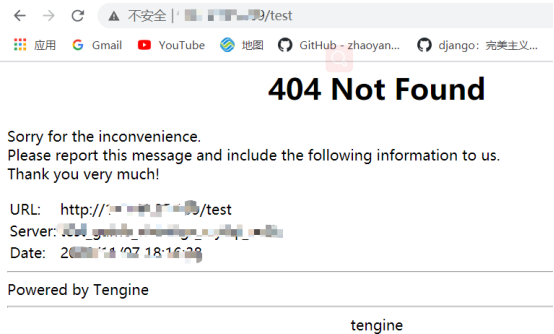
出现404是因为我们没有这个页面哈,不是cc导致的哈。
注:以上的请求速率和时间只能作为参考,大家线上使用具体还要根据相应环境进行调整
异常URL策略配置
需要在config.lua中开启config_url_check = "on"参数 然后定义rule-config/url.rule文件,url.rule文件默认为如下,如果匹配到规则的将跳转到由config.lua中config_waf_output = "html"参数指定的页面
1.禁止URL访问 .htaccess|.bash_history 的文件
2.禁止URL访问包含带有phpmyadmin|jmx-console|admin-console|jmxinvokerservlet地址
3.禁止URL访问包含 java.lang 的地址
4.禁止URL访问包含 .svn/的地址
cat url.rule
\.(htaccess|bash_history)
\.(bak|inc|old|mdb|sql|backup|java|class|tgz|gz|tar|zip)$
(phpmyadmin|jmx-console|admin-console|jmxinvokerservlet)
java\.lang
\.svn\/
/(attachments|upimg|images|css|uploadfiles|html|uploads|templets|static|template|data|inc|forumdata|upload|includes|cache|avatar)/(\\w+).(php|jsp)
假如你不想让别人访问根下的/login,那么就可以写入到配置中
cat url.rule
\.(htaccess|bash_history)
\.(bak|inc|old|mdb|sql|backup|java|class|tgz|gz|tar|zip)$
(phpmyadmin|jmx-console|admin-console|jmxinvokerservlet)
java\.lang
\.svn\/
/(attachments|upimg|images|css|uploadfiles|html|uploads|templets|static|template|data|inc|forumdata|upload|includes|cache|avatar)/(\\w+).(php|jsp)
/login

然后进行重启后访问,如下就跳转到了我们在config.lua中指定的页面,此页面可根据需求进行修改。如果上面默认的url规则匹配到了你的地址,那么你就可以把相应配置去掉

异常UserAgent策略配置
需要在config.lua中开启
config_user_agent_check = "on"参数WAF模块中默认封锁了以下UserAgent,如 HTTrack网站下载 namp网络扫描 audit网络审计 dirbuster网站目录扫描 pangolin SQL注入工具 scan网络扫描 hydra密码暴力破解 libwww漏洞工具 sqlmap自动SQL注入工具 w3af网络扫描 Nikto Web漏洞扫描 ... 等等
cat useragent.rule
(HTTrack|harvest|audit|dirbuster|pangolin|nmap|sqln|-scan|hydra|Parser|libwww|BBBike|sqlmap|w3af|owasp|Nikto|fimap|havij|PycURL|zmeu|BabyKrokodil|netsparker|httperf|bench)
我们正常访问URL是没问题的,下面来模拟一个非法的UserAgent进行访问
#模拟网站下载
# curl http://127.0.0.1:80/ --user-agent 'HTTrack'
<html>
<head>
<meta http-equiv="Content-Type" content="text/html; charset=utf-8" />
<meta http-equiv="Content-Language" content="zh-cn" />
<title>OpsAny|Web应用防火墙</title>
</head>
<body>
<h1 align="center"> 欢迎白帽子进行授权安全测试,安全漏洞请联系QQ:57459267
</body>
</html>
#模拟nmap网络扫描
# curl http://127.0.0.1:80/ --user-agent 'nmap'
<html>
<head>
<meta http-equiv="Content-Type" content="text/html; charset=utf-8" />
<meta http-equiv="Content-Language" content="zh-cn" />
<title>OpsAny|Web应用防火墙</title>
</head>
<body>
<h1 align="center"> 欢迎白帽子进行授权安全测试,安全漏洞请联系QQ:57459267
</body>
</html>
# 添加禁止Chrome浏览器访问的UserAgent
#跟随配置添加到最后
cat useragent.rule
(HTTrack|harvest|audit|dirbuster|pangolin|nmap|sqln|-scan|hydra|Parser|libwww|BBBike|sqlmap|w3af|owasp|Nikto|fimap|havij|PycURL|zmeu|BabyKrokodil|netsparker|httperf|bench|Chrome)


如上所示全部命中了WAF的规则
异常Get参数策略配置
需要在config.lua配置中开启
config_url_args_check = "on"参数默认封锁了如下:
cat args.rule
\.\./
\:\$
\$\{
select.+(from|limit)
(?:(union(.*?)select))
having|rongjitest
sleep\((\s*)(\d*)(\s*)\)
benchmark\((.*)\,(.*)\)
base64_decode\(
(?:from\W+information_schema\W)
(?:(?:current_)user|database|schema|connection_id)\s*\(
(?:etc\/\W*passwd)
into(\s+)+(?:dump|out)file\s*
group\s+by.+\(
xwork.MethodAccessor
(?:define|eval|file_get_contents|include|require|require_once|shell_exec|phpinfo|system|passthru|preg_\w+|execute|echo|print|print_r|var_dump|(fp)open|alert|showmodaldialog)\(
xwork\.MethodAccessor
(gopher|doc|php|glob|file|phar|zlib|ftp|ldap|dict|ogg|data)\:\/
java\.lang
\$_(GET|post|cookie|files|session|env|phplib|GLOBALS|SERVER)[
\<(iframe|script|body|img|layer|div|meta|style|base|object|input)
(onmouseover|onerror|onload)\=
我们进行访问 http://127.0.0.1/hello?aa=select id from mysql,得到如下,进行匹配
# curl 'http://127.0.0.1/hello?aa=select id from mysql'
<html>
<head>
<meta http-equiv="Content-Type" content="text/html; charset=utf-8" />
<meta http-equiv="Content-Language" content="zh-cn" />
<title>OpsAny|Web应用防火墙</title>
</head>
<body>
<h1 align="center"> 欢迎白帽子进行授权安全测试,安全漏洞请联系QQ:57459267
</body>
</html>
我们也可以根据自己需求去配置,如下最后添加abcops
cat args.rule
\.\./
\:\$
\$\{
select.+(from|limit)
(?:(union(.*?)select))
having|rongjitest
sleep\((\s*)(\d*)(\s*)\)
benchmark\((.*)\,(.*)\)
base64_decode\(
(?:from\W+information_schema\W)
(?:(?:current_)user|database|schema|connection_id)\s*\(
(?:etc\/\W*passwd)
into(\s+)+(?:dump|out)file\s*
group\s+by.+\(
xwork.MethodAccessor
(?:define|eval|file_get_contents|include|require|require_once|shell_exec|phpinfo|system|passthru|preg_\w+|execute|echo|print|print_r|var_dump|(fp)open|alert|showmodaldialog)\(
xwork\.MethodAccessor
(gopher|doc|php|glob|file|phar|zlib|ftp|ldap|dict|ogg|data)\:\/
java\.lang
\$_(GET|post|cookie|files|session|env|phplib|GLOBALS|SERVER)[
\<(iframe|script|body|img|layer|div|meta|style|base|object|input)
(onmouseover|onerror|onload)\=
abcops

然后我们进行访问http://xx.xxx.xxxx.xxx/hello?aa=abcops也会匹配到规则

异常POST参数策略配置
需要在config.lua中开启
config_post_check = "on"选项默认POST请求封禁如下,POST封禁内容与GET相似
cat post.rule
\.\./
select.+(from|limit)
(?:(union(.*?)select))
having|rongjitest
sleep\((\s*)(\d*)(\s*)\)
benchmark\((.*)\,(.*)\)
base64_decode\(
(?:from\W+information_schema\W)
(?:(?:current_)user|database|schema|connection_id)\s*\(
(?:etc\/\W*passwd)
into(\s+)+(?:dump|out)file\s*
group\s+by.+\(
xwork.MethodAccessor
(?:define|eval|file_get_contents|include|require|require_once|shell_exec|phpinfo|system|passthru|preg_\w+|execute|echo|print|print_r|var_dump|(fp)open|alert|showmodaldialog)\(
xwork\.MethodAccessor
(gopher|doc|php|glob|file|phar|zlib|ftp|ldap|dict|ogg|data)\:\/
java\.lang
\$_(GET|post|cookie|files|session|env|phplib|GLOBALS|SERVER)[
\<(iframe|script|body|img|layer|div|meta|style|base|object|input)
(onmouseover|onerror|onload)\=
直接对POST策略进行提交请求,通过curl -XPOST来进行提交POST请求
# curl -XPOST 'http://127.0.0.1/hello?aa=select id from mysql'
<html>
<head>
<meta http-equiv="Content-Type" content="text/html; charset=utf-8" />
<meta http-equiv="Content-Language" content="zh-cn" />
<title>OpsAny|Web应用防火墙</title>
</head>
<body>
<h1 align="center"> 欢迎白帽子进行授权安全测试,安全漏洞请联系QQ:57459267
</body>
</html>
如上命中规则,我们查看tengine日志,查看是否为POST请求
